Wednesday, March 29, 2017

Thing 34: Collaborating, Connecting, Sharing


Thing 34: Collaborating, Connecting, Sharing

As I was browsing the topics and deciding which “thing” to work on next, this one caught my eye. At first I didn’t think it’d be one to delve into, but when I noticed the option for an “EasyBib add-on” for Google Drive, my interest was piqued!   My  library has a cart full of ChromeBooks, so I’ve been learning many things Google new this year.   Interestingly enough, I happen to be teaching citations and EasyBib to my 6th graders this week!  The other new tool I explored more in-depth was Kaizena.

I started by reading through the reviews on the link provided and found some mixed reviews. It sounded like the EasyBib add-on works great for basic sources, but is not the best for higher education and more complicated documents, speeches, etc.  I decided to try it out by adding the regular link to EasyBib on my library website ( http://mms.dboces.opalsinfo.net/bin/home ) with a tab for “Citation Tools”.  Up until this year I’ve used Knightcite, so that is also still shown as well.

Students found it easy to enter websites and book titles into EasyBib. They generated their list of citations, and could then check off the ones they wanted to include in their research project. (Sometimes students ended up with duplicate citations, so I had them be sure to select only one if they were identical.)  I was amazed to discover upon clicking “export” that EasyBib sends the citation list directly to Google Docs for my students!  It clearly identifies the document name, and was super easy for my 6th graders to work with. The only downside besides the occasional duplicate citations (which could very well be student error!), is that we failed to realize that if the student didn’t finish citing all of their sources in one sitting, the citations they DID complete would not be saved for the next time. Oops!  Unfortunately, I had to learn this the hard way and when my 6th grader exclaimed, “Wait! It didn’t save the citations I made yesterday!”.  Lesson learned! I will definitely continue to use EasyBib with Google. I need to check in my Tech Director to see if I am allowed to activate the add-ons myself, or if that is something she needs to manage.

Next, I decided to learn more about Google add-ons by browsing the article “15 Best Google Drive Add-Ons for Education”. I had no idea Google could things like this! I tweeted the article out to my Twitter followers, tagging a couple of my fellow educators (@MCSDlibrary). There is an add-on for everyone, whether English, Math, or Library! Amazing! I explored a couple of them, including Kaizena, since I noticed it appears on both the “thing resource list” AND within this article. As I watched the video tutorial, I couldn’t help but think it was much like Google Classroom, which students are already familiar with, and didn’t think Kaizena was something I would look into adding.  I suppose it would depend on the student population a teacher works with, since it allows for the audio commenting rather than just textual. For me, I don’t see myself continuing to use it at this time.

Some of the resources listed in this “thing” that I was already familiar with. I am already a very active user of Google Drive, and use it to share documents with students and colleagues quite often, and I learned about appear.in while working on one of the other “things” in this course (maybe last year?).  I created an appear.in account and now my son actually uses it to “meet up” with his fellow 4th grade buddies after school virtually.  He uses it more than me! My daughter introduced me to a similar app that isn’t mentioned in this “thing”, so you may be interested in checking out “HouseParty” as well. At first I was put off by the name, but it does work well for collaborative efforts (my 8th grader uses it to work on collaborative homework projects with her classmates).

I also took a look at the Six Tools for Collaborative Brainstorming – A Comparison Chart but wasn’t immediately drawn into anything on the chart (plus my school does not have BOX so it wasn’t easily compatible to view in Google Docs).

The Best of Breed 2016 website was great though, and I bookmarked that one. It will be a good reference when I need to look for a particular type of learning tools. I especially appreciate how it is laid out into the 4 categories for quick selection!

Lastly, I check out the “New Tools” libguide from Springfield township, and WHOA! What an amazing collection that is!  Another bookmark went in for that one… a bit much to digest at once, but it will be a great resource when I am looking for something specific.

I love how I am able to glean so many new resources in every “thing” I complete.  It keeps me motivated and always trying out new things with my students.  Another great learning activity! 

Thursday, March 16, 2017

Thing 35 - Web Presence


Thing 35 - Web Presence

As I read through the assignment for thing 35, I reflected on the experiences I’ve had with both Blogger (which I use for this course) and Weebly (which I’ve used in the past in my personal life). Both are straightforward and easy to use, and I would say I like both equally.  Since this is my third “Cool Tools” course, I appreciate how I can continue adding to the same blog via Blogger. It’s very useful to have this a reference for myself when I want to go back use some of the things I’ve learned but need a refresher.

My school uses several Google products, but I’ve never explored Google Sites before, so I decided to look at some examples of ways it is being used. I visited the Holliston High School page and went to see how the library webpage looked. I found it rather simple, and not all that visually appealing. Interestingly, the Staples Library Learning Commons site was TOO visually stimulating for me!  The varying layouts were good to show the flexibility of Google Sites though - clearly it can be customized quite a bit!

When I saw LibGuides included on this “thing”, I was very excited! I’ve heard of them, and seen them come up in Google searches before, but never really knew what they were. I didn’t even realize they are something I can subscribe to! I will be reaching out to my School Library System coordinator at BOCES for sure.  I always thought “libguides” was a generic term and that librarians were just making them themselves!  Since I don’t currently have a subscription to LibGuides, I tried my hand at making my own version.  Check out the tabs called “SS8 Settlement of the West” and “Science 7 Elements” about half way on my library homepage (powered by OPALS): http://mms.dboces.opalsinfo.net/bin/home  I think they turned out pretty good!

I found the “tips” helpful - especially the reminder to keep your webpage fresh.  I need to do a better job of updating it and making it more dynamic. For my “learning activity”, I chose:
“Examine your current web site: what needs to change? Look at other school library websites and get ideas. Create a plan for moving to your dream site!”.

I explored the library webpages of nearby school libraries to get ideas. Overall, I think my webpage looks okay (link is included above).  I’d like to add more pictures that I swap out every week or two, as well as post photos of student projects. I also plan to add more of my homemade “pathfinders” as I collaborate with different teachers & content areas. Now that I realize what the LibGuides are, I hope to also gain access to them officially.

Thank you for another great “thing”!

Friday, March 3, 2017

Thing 16: Media Skills


Thing 16: Media Skills

Since I teach a Digital Literacy course, and pride myself on my knowledge of Web 2.0 tools (mostly thanks to these “Cool Tools” courses!), I had to check out Thing 16’s updates for this year.  I read through the whole assignment, and took a look at a couple of the examples. I love the photography scavenger hunt idea, and forwarded that link to my husband who has a Middle School Photography Club in his school district.

After looking at the examples, I browsed through the learning activity suggestions. I already knew how to do a screenshot of my computer, so I moved on to other ideas for something new. The animated GIF creator and Instagram “FlipaGram” each caught my eye - I’ve tried (unsuccessfully) to create the animated GIFs on my way own, and I’ve never heard of a FlipaGram - so these two seemed the perfect places to get started.

I looked at the flower GIF as an example, and then began with the GIF tutorial video featuring www.Makeagif.com and www.giphy.com (good selection of actual GIFs to see how other people are using them). I love how the tutorial clearly explained the Makeagif website’s tools and options. I learned that there are different types of GIF files: series of still images that tell a short story, series of drawings that create a fluid animation, slide show, etc.

Steps from the video tutorial to create basic slideshow GIF:
-Gather and save all images I want to use to a folder on my computer
-Go to makeagif.com (create free account), and add pictures
-Choose order images appear, speed of photo changes (faster speeds give illusion of movement)
-Add details and rating, create GIF - and it’s ready to share!

After watching the video, I decided to give it a try! I found a video on YouTube of one of our horses, Zoe, galloping around the arena. I selected a “dramatic” segment on the video and used it to create my first GIF! It can be viewed at http://makeagif.com/i/djP1Ni .  This was really fun, and I’m excited to try it with some still images as well.  I think my Digital Literacy students will enjoy creating GIFs of their own as we start our research projects. For those, I plan to use the still image “slideshow” animated GIFs.

Next, I moved on to the FlipaGram tutorial. I had to start by downloading the app to my iPhone. I had some photographs of my Middle School Yearbook Club members on my phone so I decided to try it out using those three images along with some music in the background. The tutorial walked me through the entire process, and offered extra information I didn’t try out yet (like adding text). I posted the FlipaGram to my school Instagram account viewable under username mcsdlibrary (Millbrook Library Media Center) - sorry I couldn’t figure out how to link to it directly in this blog!

I really learned a lot from this “Thing” and look forward to implementing both of my focus areas with my classes.  The GIF creator is something I will have my students actually use to create content relevant to their class projects and our upcoming author visits.  The FlipaGram will be most useful for me professionally in keeping up with technology and using my creations on my library social media - must stay fresh and “relevant” to the students! Thanks for another great “thing” learning experience!

Wednesday, March 1, 2017

Thing 33 - eBook Creation


eBook Creation - Thing 33

Having just completed the Digital Storytelling “thing”, and keeping my upcoming ELA7 collaboration in mind, I was very excited to see this new “thing” with ideas for creating eBooks. It seemed like the perfect topic to continue with!  This is the first year my school has fully embraced Google and Google Classroom / Google Drive so I am still learning how to use all the features.  When I saw that Google Slides could be used for eBook creation, I was super excited to explore that option. I have 24 ChromeBooks in my library, so using a Google “app” for this 7th grade project would be an ideal way to get “my feet wet” with both eBook publishing and extending my knowledge of Google applications.

Before I got going with Google Slides, I explored StoryBird so I’d have something to compare Google slides to. I found StoryBird a bit too “young” feeling for what I have in mind for the 7th grade project. It was simple to use though.

So on to Google Slides eBooks! I opened a new Google Slides project and followed the directions to customize the layout. I then went downloaded and printed the Google Cheat Sheets eBook and printed the detailed information on How to Create an Interactive eBook on Google slides. After browsing through this information, I began creating a Google Slides eBook about our upcoming visiting author Wendy Mass.

I entered some basic information onto slides with varying backgrounds within the theme. I experimented with doing my own master slide edits, but found it simple enough to customize the regular Google slides template on my own, so I didn’t really explore changing the master slides too much.  The video tutorial moved pretty quickly, and did not have voice-over, so that will take a couple of viewings the fully comprehend. I did see how the author was able to change the template with the gray header box and create space holders. I was inspired to attempt bringing a YouTube video into my eBook, though, and found the movie trailer for Jeremy Fink and the Meaning of Life (one of her books that was made into a movie).  Success!!

After I finished adding content, I went back to the tutorial to learn how to export the eBook and publish for the web.  I already knew how to download/export as a PDF, but had never created anything for direct web publication. It was so easy to do!  You can check out my eBook about Wendy Mass that I created by visiting the following URL:

After going through this exercise, I’m not 100% sure that this will work for the 7th grade project, since they are looking at more animation & sound features for the bedtime stories project. However, I now better understand the difference between digital storytelling from my earlier “thing” and eBook publishing. Since I have several ChromeBooks in my library, I looked at Book Creators for Chromebooks to get specific ideas for publishing student eBooks to my library webpage in the future.  I plan to introduce eBook publishing with my 6th graders for sure - they can publish digital version of the Zines they are making in preparation for our Wendy Mass visit. It is something I think they will definitely enjoy - just like I enjoyed learning about eBook creation using Google slides! 

Friday, February 24, 2017

Thing 4: Digital Storytelling UPDATED


Thing 4: Digital Storytelling

Although I did this topic way back in Cool Tools 1, I wanted to re-visit it since there are so many new tools and ideas that have been developed in the past couple of years. It also came at perfect timing because the 7th grade ELA teacher in my school just asked me to collaborate with him on a Digital Storytelling project! Of course I said YES! I immediately dove into Thing 4 to get some new ideas.

As recommended, I began with the article 6 Reasons You Should Be Doing Storytelling With Your Students.  I appreciated that the article reinforced the benefits of this sort of activity: it creates leadership in students through giving them initiative to be decision makers and problem solvers, it increases technological competencies and prepares students for tech careers down the road, and most importantly when working with my ELA7 students: “Digital storytelling is still writing. Whether it is a multi-day project or a storyboard created in ten minutes, the process for digital storytelling is the same as any other project:”
  • Brainstorm
  • Plan
  • Create
  • Revise
  • Edit
  • Publish
  • Reflect
Additionally, digital storytelling encourages creativity and can produce a final project that is easily collaborated on and shared out, all while providing an alternative means of assessment.
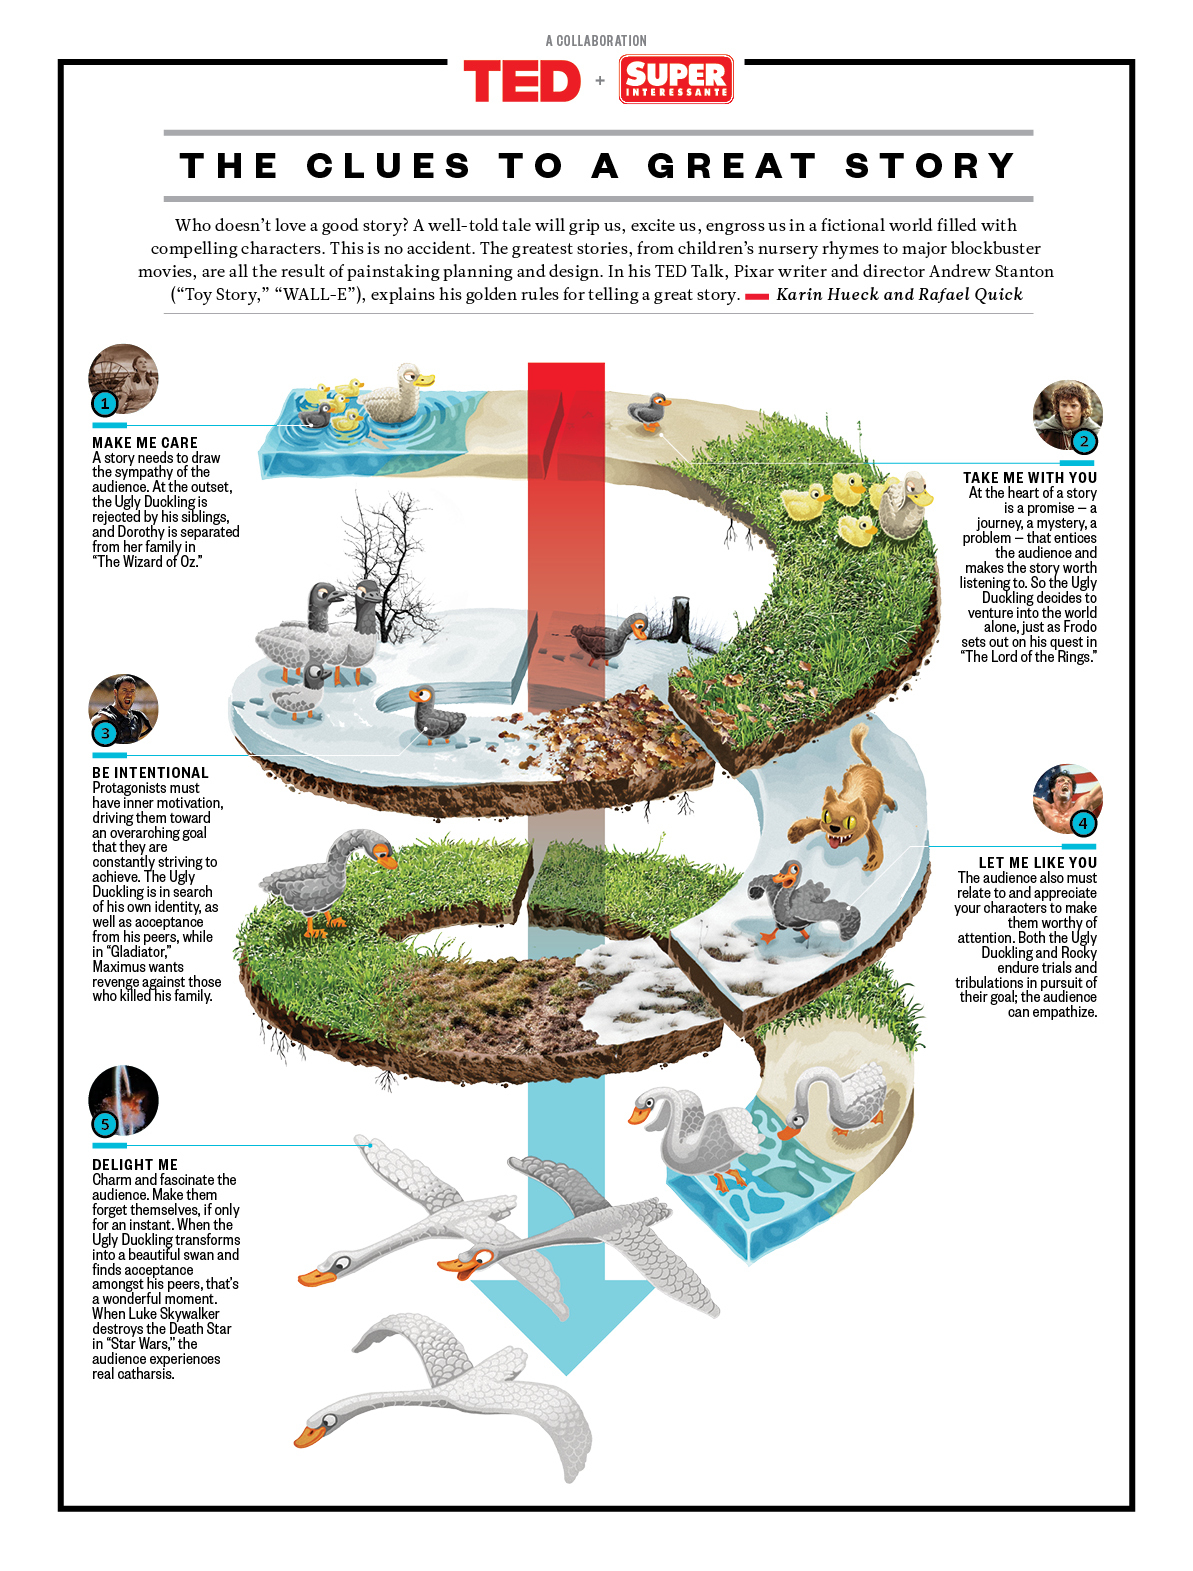
I then went back to the Thing 4 assignment list of resources, and the article The 5 Rules of Digital Storytelling Every Teacher Should Know About  next caught my eye. The TED talk by Andrew Stanton, the Pixar writer and director behind both Toy Story and WALL-E, talks about some of these rules in The clues to a great story. I shared this video with the ELA7 teacher as well, and then checked out the infographic that went with it:
The infographic seemed like it’d be a handy reference, so I printed out a color version to have handy during the upcoming project.

The Teacher’s Guide to Digital Storytelling was my next stop, since I was still looking for specific ideas on how to use digital storytelling with the students. I liked how this article immediately referenced the meaningfulness of this tool, stating “Teaching critical thinking and creativity in writing can be a difficult task, but it is crucial in preparing students to meet the standards of the Common Core. Digital storytelling is a highly effective technique for doing so, as it requires a clear organization of thought, discipline, and problem solving skills — all of which can translate directly into more traditional essay writing.”  This would be a great article to share with administrators who are interested in learning more about the value of digital storytelling in the academic curriculum.

Sorry for the long “copy and paste” from the above article here, but I wanted to keep this list handy for future reference, since I really like some of these ideas and definitely want to revisit them:
Digital Storytelling Lesson Ideas
  1. Dream Scenes. Have students write a narrative essay about what they’d like to be when they grow up. Then have them draw digital pictures to animate their vision and put it all together in a YouTube video.
  2. Animated Personal Narrative. Teach students how to write a personal narrative. Then help them turn that narrative into a storyboard, and finally have them put it altogether in an xtranormal animation.
  3. Google Story. You know those (tear jerking) Google Ads, like the one that uses Gmail to tell a father’s story about his love for his daughter? Teach your students the epistolary format, and then have them write a Gmail story of their own, to be compiled via video or compressed into an illustrated PDF. Alternatively, use this Google search Parisian love story as inspiration. Have students brainstorm plotlines, write an outline, and flesh it out with the magic of Screencast-O-Matic and Google search.
  4. Historical Slide Show. Have your students pick a favorite figure from history and write their biography. Then have them scour the web for Creative Commons images that are relevant to their project, distill the biography down into its essential parts, and put it all together in a shareable Slideshare presentation.
  5. Book Trailer. Who needs a run-of-the-mill book review when you could have a book trailer? Trailers should help students practice their critical reading and analysis skills, while also developing their constructions of arguments and use of rhetoric as they battle to convince their classmates to read their book next.
  6. How To Guide. Every student has a secret talent. Have students describe theirs in a straightforward YouTube video, laying out each step in logical sequence. This is an especially effective lesson for more hands-on students who struggle with writing and need a more intuitive connection to a physical skill as they learn to lay out steps logically.
  7. Two Sides of the Story. Sick of the regular old persuasive essay? Assign students a controversial topic. Then have them research arguments supporting both sides, and put it all together in a video, presentation, or infographic that must devote air time to articulating a clear thesis for both sides of the story.
  8. Family or Community History Project. Send your students out to interview and record members of their family or community about their past. Then challenge them to put this together into a podcast, video, or newscast, reviewing all that’s come before.

I also enjoyed checking out some of the sample projects included in the list, such as “Don’t Let the Pigeon be the the Principal” book trailer and some of the teacher guide links, and appreciated the “ready to go” list of Creative Commons image libraries. They definitely make it easier to convince students not to simply “steal” from Google images (of which I’m guilty of myself!). I will bookmark my favorites from the list and use them as my “go to” image libraries when teaching lessons that include photos.

Of all of the options I looked through, Adobe Spark’s “Tell a Story” option seemed the perfect place to start considering the project I hope to do with the 7th grade English classes. I loved the animated story examples! I decided to have one of my current students test out Adobe Spark for me as part of his author study project. It turned out to be very easy to use. Here is the link to my 6th grader’s author study presentation: https://spark.adobe.com/video/aWANgawUBrzrG

I can’t wait to try this out with the ELA7 classes in late March! Another great “thing”!

Wednesday, February 22, 2017

Thing 26: Makerspaces


Thing 26: Makerspaces

Before starting this “thing”, I had some basic understanding of what a makerspace is. I’ve attended a workshop on how to get started with them in my school library, but still didn’t quite grasp how to really implement this sort of space into my middle school library.

I started out by reading the article “What is a Makerspace?” to see if I could gain a better understanding. Most of the information was general, including the links to helpful tips. I did appreciate the different sections on multi-literacies, participatory learning, professional standards, and setting up a makerspace. However, I still didn’t feel this article helped me with gaining insight into how to actually implement a makerspace in my school library.

That being said, I moved on to the next article on Edutopia: Fostering Creativity With Makerspaces.  This article also had helpful hints, broken down into the following sections, complete with a photograph example for each tip:
1- Find the space: the library can work because it should be the hub of learning, open all day, and already monitored by staff.
2- Find the money: Write as many grant proposals as possible.
3- Find the tools: filled with tools that students wanted and tools to get the students thinking.
A few things that have been popular in other makerspaces and ended up being used immediately included:
  1. Makerbot.3D printer
  2. Ideapaint on a wall (students can write directly on it)
  3. Makey Makey is a great tool to get kids thinking about programming
  4. Chromebooks so students can access work from home
4- Find the Students
There are students that have been waiting for a space like this our school. The minute word got out that a makerspace was going in, those students started hanging out in the library. Use the school newspaper, put something on the announcements, hang fliers in the hallway, visit classrooms, and do anything else you can think of to get students talking about the space. They're the ones who will make or break the space. Promoting the creativity aspect will make a difference. A makerspace is a great place to get away from the standardized testing and try something new and exciting. Maker contests are another way to bring kids in. We hope to run one per semester. Once the students populate the space, the rest will take care of itself.

Having already a good sense of the “what and why”, I decided to move on to the next section of suggested reading articles, hoping the “planning and how to” articles would be more of what I was looking for to help me get started.

I started with the article “Setting Up Your Own Makerspace”, and WOW! It was an amazing resource on how to actually get up and running - and was exactly the sort of thing I was hoping for! The author’s own school website, http://lc.liberty.k12.mo.us/MakerSpace itself has a plethora of information to help new MakerSpaces get started. I will definitely refer back to this webpage when I’m at that point in the process with my own school library’s MakerSpace!

I decided to reach out to Shannon Mersand, a library media specialist who does MakerSpace presentations, and ask her for specific ideas. We communicated via e-mail and I was able to get a lot of tips, including asking our tech department to save laptop boxes (kind of like pizza boxes) for me to use in my MakerSpace to store “in progress” students projects and setting up a dry erase table in the MakerSpace area to simplify student project planning.  I plan to implement many of her tips!

  • How do makerspaces connect with learning? How do the fit in schools and libraries?
    I think MakerSpaces help students connect with learning by offering a variety of tools from which they can learn. MakerSpaces can fit into school libraries in lots of ways: offering students a place to visit during lunch/study hall/after school periods; in collaboration with robotics club advisor, and possibly other subject area classes as well.
  • What do students gain from making?
    Hands-on creation makes learning more memorable and engaging. It also offers skills that students might not necessarily be able to practice in other classes.
  • What sort of makerspace might you create in your school?
    I’m in the process of setting one up this year.  I have 9 dedicated shelving units with plastic bins that I label.  Right now I have everything ranging from glue sticks & construction paper to a couple of K’Nex and circuitry sets to a pair of OzoBots.  Now it’s just continuing to learn how to actually use them and implement them into the school program.
  • How would you justify your plans to your school administration?
    I’m fortunate to have a very supportive administration, and using the explanations above, supported by some of the articles and websites included in this “thing”, I would be in excellent shape if asked to justify this space in our school library.


Wednesday, February 8, 2017

Thing 23: Infographics & Data Visualization

Thing 23: Infographics & Data Visualization

To begin, I compared the data visualization vs infographic examples to make sure I understood the difference between the two things.

I am still preparing for my upcoming Board of Ed presentation, so I considered that when selecting a topic for my project. Since we are in our first year with increased library staffing (3 full-time library media specialists), I decided it’d be important to show how circulation has increased since this change. As K-12 Coordinator of Library Services for my District, I have access to many reports for each of my four school libraries. I wanted to learn how to create a data visualization that encompasses all four schools, and hopefully reflect an increase of usage/circulation.

To get started, I explored some of the resources listed in this “Thing”:

“Dissecting an Infographic ” was interesting and one I might use with my students to show how even the most “official” or realistic looking graphics may still be deceiving. Only the most perceptive people may notice the publication date, which proved to be critical to the accuracy of the information regarding plane crashes & deaths in a given year. Creating content in March and making a claim for the entire year is rather premature (and inaccurate!).

“Infographics Lie. Here’s How To Spot The B.S.” was also a helpful tool and one that I may take content from for my own classes. I particularly noted the importance of the quote: “time and time again we have seen that data visualizations can easily be manipulated to lie. By misrepresenting, altering, or faking the data they visualize, data scientists can twist public opinion to their benefit and even profit at our expense.”  So important for the public to remember!

The Complete Guide to Creating Infographics for Non-designers was very helpful. At first I almost stopped exploring it due to the rather dry beginning, but am so glad that I decided to skim down a bit. The “quick snapshot of services” was easy to read through and explore.

I also started following the #slscooltools “conversation on Twitter and instantly found some great infographics to share. My eye was drawn to the post called: 7 Characteristics Of Teachers Who Effectively Use Technology http://buff.ly/2jNb3PG  #slscooltools and I retweeted that out to my followers. I found the information to the point and relevant to teachers sometimes struggling to include technology in their curriculum.

To create my own infographic, I thought about what information would be helpful to share. Rather than create a report like I had at first thought about doing, I decided to create an infographic for an upcoming Board of Education presentation I am doing. To do so, I decided to use Venngage to create a basic infographic using one of their “beginner” templates. I created a free account and watched the tutorial. Venngage seemed pretty easy to use, so I moved forward and created an infographic called “K-12 Library Program: Increasing Student Achievement: Three Primary Roles”. It was super easy to use their template, and I was able to figure out how to bring in images fairly easily. The most challenging part was getting a printable version, as the ability to export/download your work in Venngage is only possible if you purchase an upgraded account. This was disappointing, as I wanted a printable copy to share as a handout during my presentation. I used the vendor’s “chat now” feature to inquire about printing options, and was instantly replied to by a helpful customer service agent. She provided me with a “one time courtesy” PDF file that I successfully downloaded and printed. I really like Venngage and send the Educator pricing information to my District Technology Director in hopes of having the district pay for a subscription next year! I can see myself using this tool with students when studying infographics as part of my Digital Literacy course; and maybe even having them create their own on various topics. Thanks for exposing me to this great tool! Here is the URL for the infographic I created: